Friday, October 28, 2011

Felt Flash Cards


What a cute idea and completely indestructible!  I can't wait to give them a try!  Follow Sew Much Ado's simple tutorial.  If you make two sets you can use them as a memory game too!

Monday, October 24, 2011

Ghost Bowling

I made it back!  Our internet has been on the fritz and I would be booted off after just a few minutes.  A big huge thanks to the repairman!

It's time to get into the holiday spirit, Halloween is less than a week away!  This is a fun, easy and frugal activity for the kiddos. Ghost Bowling...


Check out the easy how-to on HGTV's website.

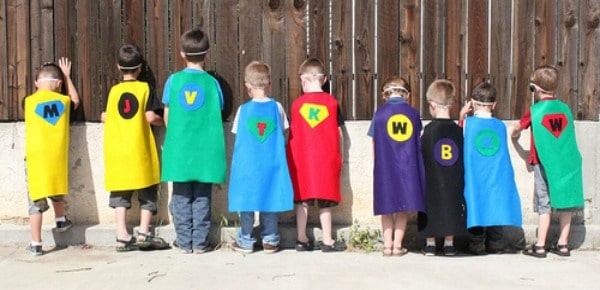
And, who doesn't love a costume?  These capes can make anyone into a superhero!  Especially mama since they are NO SEW...wooohooo!


How cute are these???  Get the tutorial from Somewhat Simple.

Thursday, October 13, 2011

It's for the Dogs!

As Halloween approaches I have been keeping my eye out for cute costumes.  Today it's for the dogs!!
Check out the "how to" for this one from Martha Stewart.

She also has these fabulous dog tags that I think I will need to try out.  They would make great gifts too!

Pet ID Tag

See the tutorial at Martha Stewart's site!

Friday, October 7, 2011

T-Shirt Makeover #5


Is this fantastic or what!!!???  I especially love the combo of the ruffles and the flowers, so sweet.  I am so excited to try it.  


Sachiko from Tea Rose Home is so creative!  Let's follow along as she does her tutorial!

One day I was at a Down East store, and going through their sales rack and found this...(The folded shirt on the left is my old shirt, I am going to use this too.)


I couldn't believe my eyes, yes, I know, it was a $1!!! I asked if there are more in the back, but he said this was a left over from two summers ago, and there is no more... oh well, lucky me! I have a perfect plan for this shirt.

1. Cut the side of one shirt and open it up. Use the picture as a guide and cut up 6 peices of 2 1/2" X 12" and 2 peices of 1 1/4" strips.


2. Using big stitches, sew 2 1/2" strips a 1/4" from the edge. Pull one thread to make the ruffles. I made the the top of the ruffles 7" wide.


3. Sew the 1 1/4" strips together and make longer strips. Using big stitches, sew
the middle, pull one string to make ruffles.


4. First, pin the long strips around the neck line. Don't forget to leave the front part for the other ruffles.


5. Then, attach the front ruffles. Make sure that the center of the shirt and center of the ruffle lines up.


6. To add the second row of ruffles, measure 1 1/2" from the edge of the first row of ruffles and line the top of the next row to it. Sew. Repeat the process to complete the shirt.

You can stop here. The shirt look perfectly ok... but I added a corsage. If you want to do so, keep reading...


7. To make the fabric string: cut one 1/2" string and strech it. To make the corsage, cut 1" strips, sew the center with big stitches and make ruffle first.


8. Take the ruffle you made at step 7, and fold it in half.


9. To start sewing the corsage, roll up the end, and start sewing the folded part, and keep spinning and sewing...


10. There, you have a flower...Now, sew them onto your desired place and the only thing left for you to do is enjoy.


That is what I did today.


Except, Rachel kept telling people, "There is an American flag hiding!" and she tried to lift up the ruffles... shhhh, naughty girl.


I was amazed by this creation!  I just love it!  Please head over to Tea Rose Home and let her know what you think.  Also, check out her other designs!!!

Please let me know what you think of the content this week.  Have you enjoyed it?  What else would you like to see?

Until next time!!

Thursday, October 6, 2011

T-Shirt Makeover #4

Something a bit different today.  Instead of ruffles and gathers I have a completely new look.  Super simple too!
Check out what Katy at Sweet Verbena came up with!!!


Follow her tutorial from concept to completion:

I found this great lace tape at a Fabric Warehouse store. At only $.99 yard, I stocked up!


Then I caught a glimpse of Rashida Jones in I Love you Man wearing this cute lace embellished top and I thought, I could totally make my own. 


So I found a tee at my usual go-to store, Target, and got to work!  


A wordless tutorial:


Note: When sewing with knit, use a zig-zag stitch. It allows the fabric to stretch better than a straight stitch.


Easy as that! And oh so pretty.

Thanks so much to Katy for her wonderful creativity and her super simple explanations!!
Please head over to Sweet Verbena and let Katy know how much you love her design!

Also, please let me know if you try this.  I would love to hear how it turned out for you!  

And...while you're here...leave me a note.  Let me know what you think of my blog!!

Thanks and wait until you see what I have for tomorrow.  I am just dying to try it out myself!!!  Until then!

Wednesday, October 5, 2011

T-Shirt Makeover #3

This creation came from Brassy Apple.  What a cute way to spice it up.  All the little details add up to make a really fun shirt that can be casual or dressed up and a bit sassy too!  Here we go...


Materials:
2 tshirts - about 2 or 3 times bigger than you normally wear
color coordinating thread
scissors
elastic thread
sewing machine
straight pins
measuring tape


Step 1: Shir the bottom of the tee sewing about 6 lines 1/4" apart. We used our sewing foot as a guide between the stitching lines. 


Step 2: Cut off the collar. OPTIONAL: Cut a small V dip in the neckline if desired for a different neck shape.  Set aside.


Step 3: Lay the 2nd tshirt flat. Cut off the bottom hemline. Then cut 2 strips that are 3.5" wide. 


Step 4: Create 1 long strip by cutting "open" at one of the seams or simply cut the loop in half.


Step 5: Cut 1 strip 2.5" wide. Cut open as instructed above.

Step 6: Gather/Ruffle all 3 strips using a basting stitch in y our machine and gently pulling the bottom thread to gather the fabric together. (Stitch 1/4 - 1/2" in from one edge of the fabric strip)


Step 7: Pin one end of the 3.5" ruffled striped at the shoulder seam and the other end about 5-6" from the top of the shirring lines at the bottom of the tshirt lining it up in the middle.


Step 8: Adjust the gathers so the strip fits between the two pinned areas. Pin in place leaving an opening near the middle of the neckline in the front. Repeat with the other 3.5" wide ruffled strip on the opposite side of the tshirt.


Step 9: Sew the ruffles to the tshirt by stitching over the basting line. 

Step 10: Fill in the open area in the top middle of the tshirt using the 2.5" wide ruffled strip. Place one end of this strip about 1 inch over the empty area. Pin along the neckline and cut the ruffled strip to be about 1 inch over the other side. Pin in place. 


Step 11: Place a second layer of ruffles under this layer making it smaller in width and centering it under the first. (see 2 photos below) Stitch both layers of ruffles onto the tshirt. 


OPTIONAL: to create a ruffle at the neckline and shoulder area that isn't as "full", cut and or taper the ruffled fabric towards the shoulder seam until you have reached the desired look.


Step 12: Cut off the hem on each sleeve curving the edge as pictured below.


Step 13: Shir 3 lines from the cut edge to the shoulder seam. Sew 2 shirring lines on the underpart of the sleeve too.


Ta-Da!!!


I absolutely love this!!!  They did a fantastic job over at Brassy Apple coming up with this.  Please head over to their site and give them some love.  They deserve to know what a great job they did and they also have a tutorial all ready for you to download and print.  Go check them out! 
Also, please let me know that you like this and any other content on my blog by leaving me a comment!  I would love to know what you think!

Stop by tomorrow to see the next t-shirt makeover! 

Tuesday, October 4, 2011

T-Shirt Makeover #2

I hope you enjoyed Makeover #1, now on to another amazing transformation from your boring ordinary t-shirt.  Check out these creations by Little Birdie Secrets.


To refashion a t-shirt, you'll need one plain shirt, and another spare one that matches. That's the one you'll cut up into pieces, which is why it needs to match.

To add flowers to your t-shirt, you basically just cut out small hearts (ours were about 2.5" long) and sew them in bunches to the neckline of the shirt. These simple refashions only take about 30 minutes to do.

And shirts look even better after being washed/dried (the dryer fluff up the flowers nicely). If you didn't want the fluffy look, just hand washing and line drying your shirt.

Thanks so much to the ladies at Little Birdie Secrets.  If I had one thing to add to their project it would be to add more flowers.  I can just picture them running down the front in a lovely cascade of blooms.  Please head over to Little Birdie Secrets and let them know how much you love them and their creative ideas.  Also, let me know what you think of the project and especially if you give it a try!!

...until tomorrow,  where you will find another fantastic t-shirt makeover!!!  See you then!

Monday, October 3, 2011

T-Shirt Makeover #1

Here we go... T-Shirt Makeover #1!  I've been searching for my most favorite designs and narrowed it down to 1 week worth.  I'll have one everyday for you to try.  Please let me know how it goes!

Without further delay I present day #1:  Sleeves...they're here, they're gone, they're back again!


1: To make it, you'll need to take a long-sleved shirt, and cut the sleeves off so they are a nice short-sleeve length:

2: Then cut each sleeve into two 4" strips, and trim another 1" section off of each, leaving 4 3" strips.


3: Sew one end of two of the 3" strips to the end of the other two, to make 2 very long 3" strips. (do the same for 2 of the 1" strips)

4:Gather both the 3" strips into ruffles that are the length of the front of your shirt.


5: Lay the ruffles on the front of your shirt, with gathered edges ouching, then lay your 1" strip over the gathers, and pin well.

6: Sew the 1" strip and ruffles on to your shirt with a zig-zag stitch.

7: Then arrange buttons down the front, and tape them into place with clear tape. Sew them to your shirt well with a zig-zag stitch.
(You'll need to adjust the stitch width, and use the hand wheel to make sure that the needle will go into each hole without hitting the button.)


Then hem up your sleeves with a zig-zag stitch, and you're done!


Well, did you love it???!!!  I have a few t-shirts that were on their way out of my closet that might just be making a comeback after this.  Please let me know what you think!!


Thanks so much to Disney from Ruffles And Stuff for the wonderful creation!!!  She is super creative and has loads of fabulous ideas.  Please go check her out and let her know how much you love her!!

Drop by tomorrow to see what I came up with for the next T-Shirt makeover!!